Set up your music server.
Serento plays music from a server on your home network. Never set one up before? Perfect. This page walks you through it slowly, in plain language, for absolute beginners. Pick MinimServer or Plex, follow the steps for your computer, and you'll be listening in about ten minutes.
You don't need to be technical.
If you can install an app and find a folder on your computer, you can do this. There's no coding, no command line (unless you're on Linux and want to be), and nothing here can break your computer. Read it once, then follow along. We explain every click.
First, how does Serento play music?
Serento is a remote control. It doesn't store your music and it isn't the thing that makes the sound. It's the screen you hold to browse and choose. The music lives somewhere else on your home Wi-Fi, and a speaker or streamer does the actual playing. They all find each other and talk using a shared language called UPnP. Three pieces, one network:
Your music server
MinimServer or Plex. Holds all your files and knows where everything is.
Serento
On your iPhone, iPad or Mac. You browse and choose what plays.
Your renderer
A network streamer, a DAC, or even this device. Makes the sound.
Don't have a streamer? No problem. Serento can be the player too: choose “This iPhone / iPad / Mac” as the output and the sound comes straight out of the device. You still need the server (the library); the renderer is optional. So this whole guide is really about setting up the server.
Choose your music server
There are two good options. You only need one. If you're unsure, pick the one that matches you below, then jump to its steps.
MinimServer
Purpose-built for music. Lightweight, rock-solid, and the favourite of audiophiles for its bit-perfect serving and superb tag browsing. A little more hands-on to install (it needs Java), but worth it.
- Best for serious listening
- Brilliant with big, well-tagged libraries
- Runs on Windows, Mac, Linux and NAS
- Free to use; advanced tags need a €32 / $38 licence
Plex
The familiar all-in-one media server. If you already use Plex for movies, you're most of the way there: you just flip one switch to share music over UPnP. Friendliest installer of the two.
- Easiest, most familiar setup
- One-click installers everywhere
- Remember to turn on DLNA
Set up MinimServer
MinimServer runs on Java, so there are two downloads: Java first, then MinimServer. We'll get both. Pick your computer below. The steps change a little per system.
Step 0 · Install Oracle Java, for every system
MinimServer needs Java to run. Install it before MinimServer.
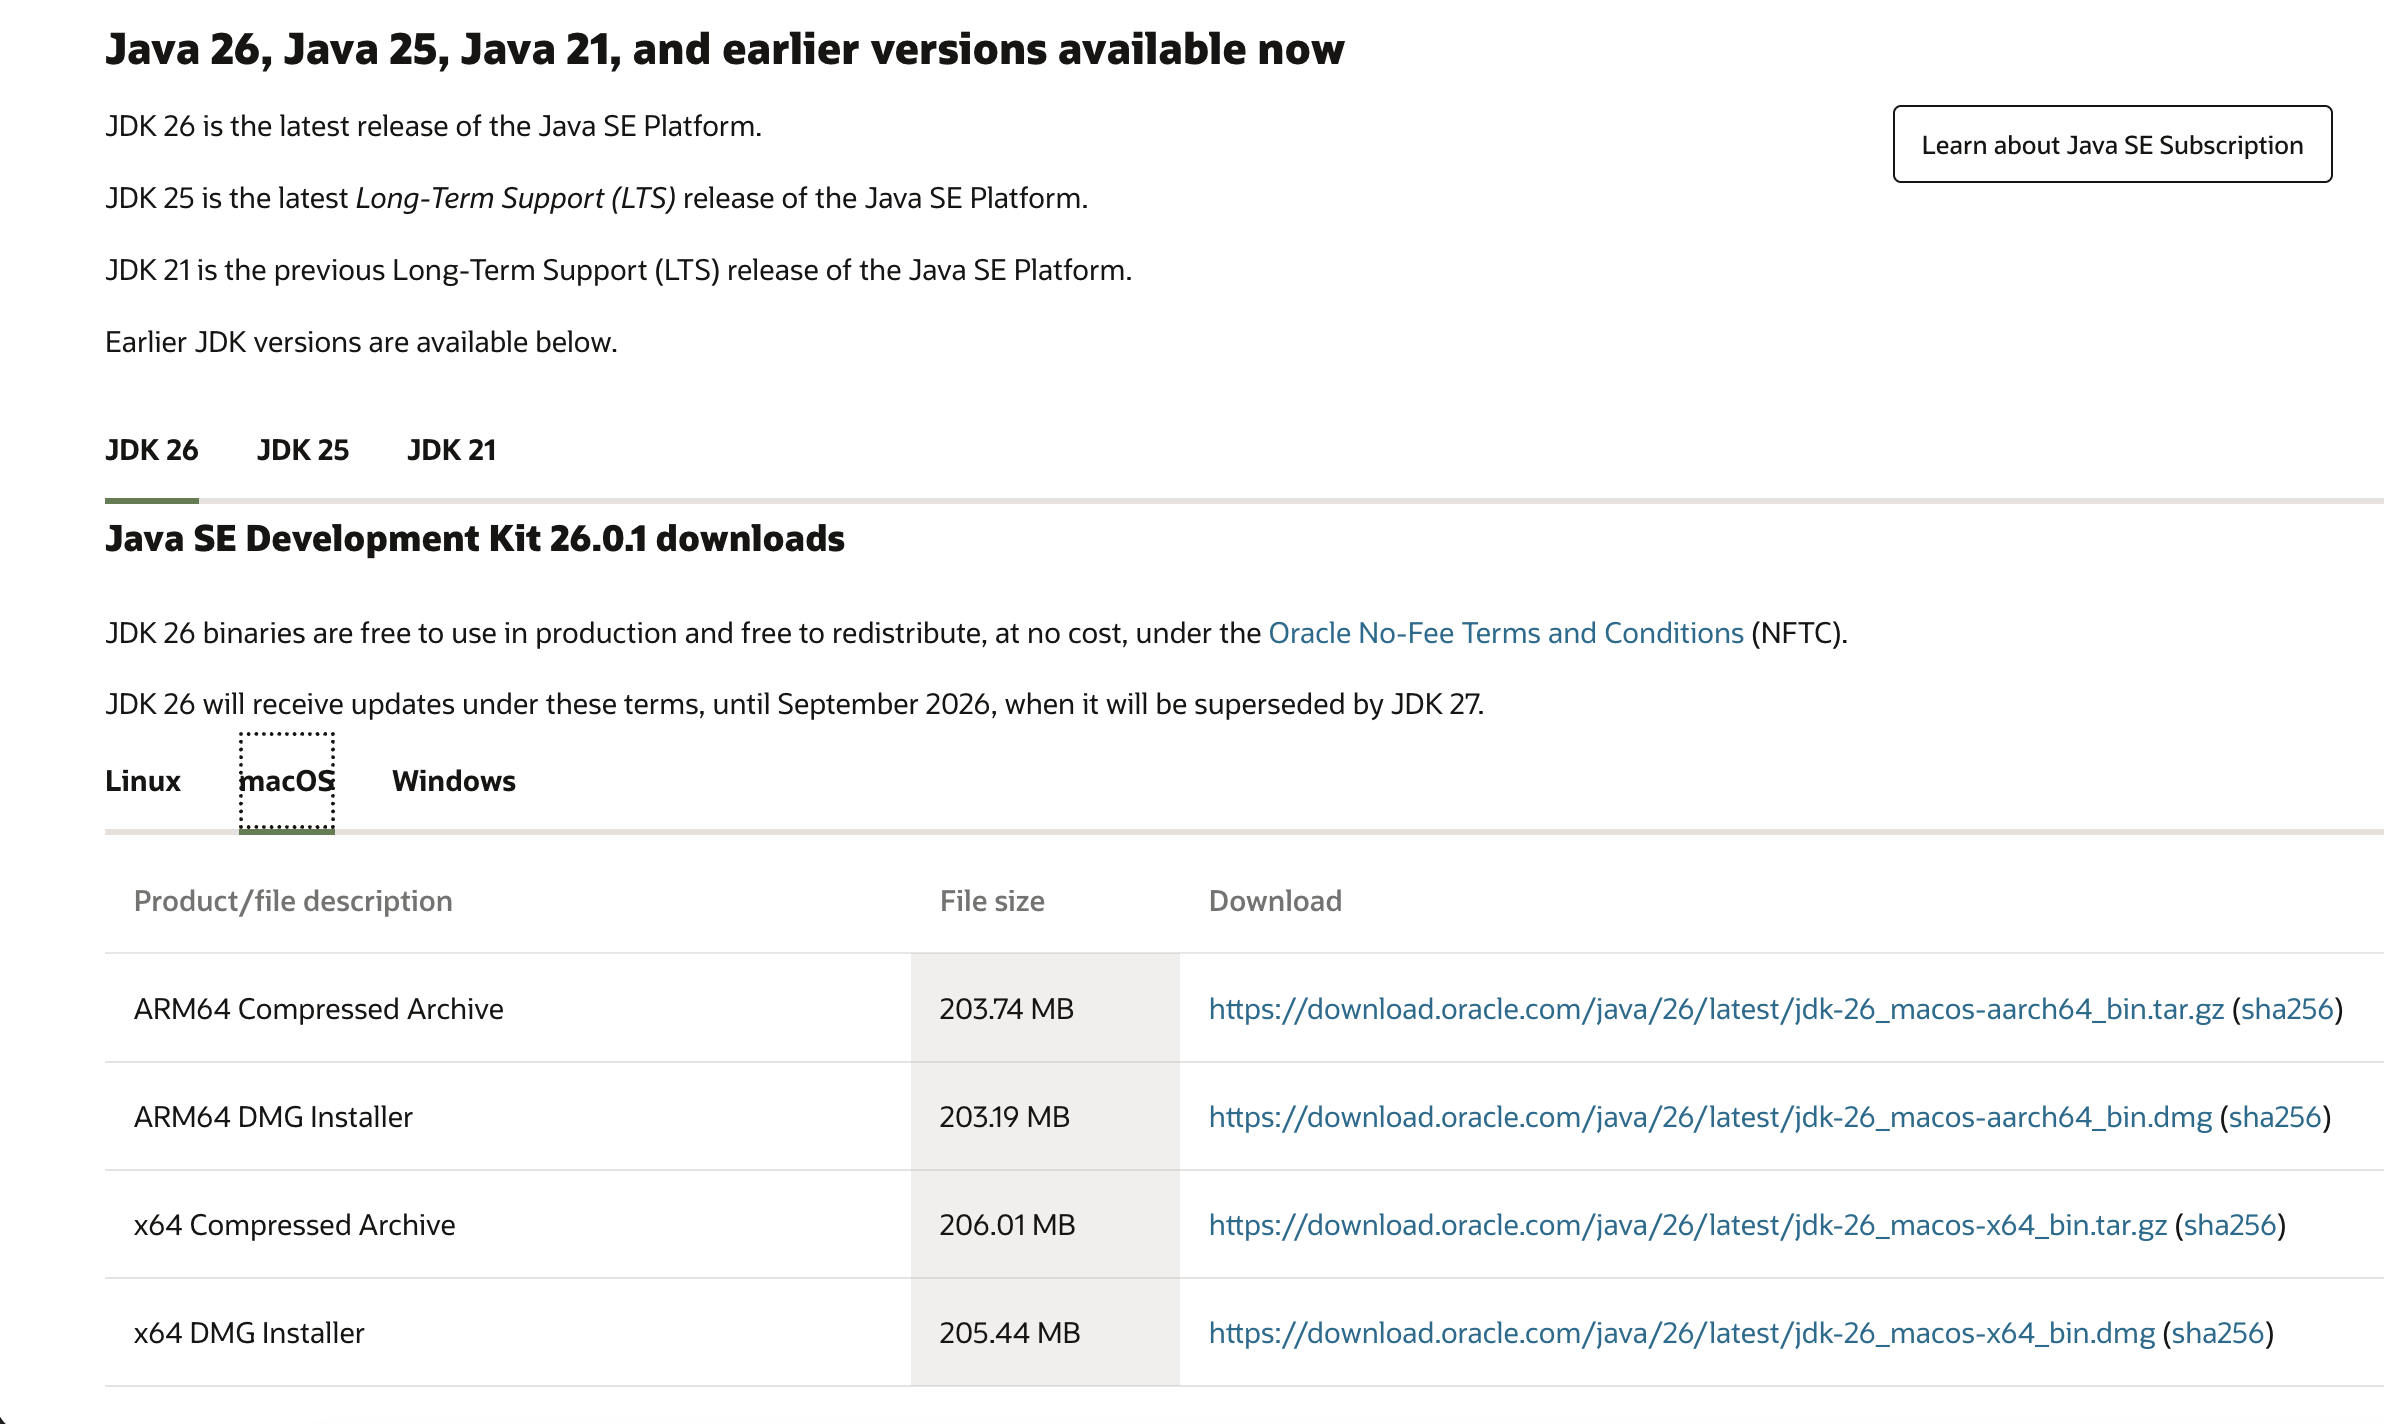
Use Java 26 or newer. Never Java 8. Lots of old guides online tell you to install “Java 8”. That advice is years out of date and today's MinimServer will not start on it. If you already have Java 8, that's fine, just install a current one alongside it.
On the Oracle Java download page choose your operating system, pick the latest version (26 or higher), and download the JDK. On Windows pick the .msi; on Mac pick the .dmg for your chip (see the Mac tab). Run it and click through. There's nothing to configure.
↓ Oracle Java (JDK 26+)oracle.com/java/technologies/downloads
↓ MinimServer 2 for Windowsminimserver.com
- Install Oracle Java 26+ first
If you haven't already, run the Oracle Java installer from Step 0 above and click Next through it.
- Download MinimServer 2
Open the link above, find the Windows download, and save the installer.
- Run the installer
Double-click the file you downloaded and click through the installer. If Windows shows a blue “Windows protected your PC” box, click More info, then Run anyway. It's safe.
- Open MinimServer
A small MinimServer icon appears near the clock (bottom-right of the screen; you may need to click the little “^” to see hidden icons). Click it to open the MinimServer window.
- Point it at your music
MinimServer asks for your music folder. Click Change, browse to where your music lives (often
C:\Users\YourName\Music), select the folder and click OK. - Let it scan
Click Rescan (or Restart). MinimServer reads your library. A big collection can take a few minutes the first time. Wait until it says it's done.
- That's it
MinimServer is now serving your music to everything on your Wi-Fi. Leave the computer on while you listen, then add the recommended configuration below for the best browsing.
↓ MinimServer 2 for macOSminimserver.com
Which Mac do you have? Apple menu, then About This Mac. If it says Apple M1/M2/M3/M4, choose the Apple Silicon (aarch64) downloads. If it says Intel, choose x64. This matters for both Java and MinimServer.
- Install Oracle Java 26+ first
Run the Oracle Java installer from Step 0, picking the version that matches your chip (Apple Silicon or Intel).
- Download MinimServer 2
From the link above, get the macOS package for your chip.
- Install it
Open the downloaded file and follow the prompts (or drag MinimServer to your Applications folder if it's a disk image).
- First launch
If macOS says the app “cannot be opened because it is from an unidentified developer”, right-click the app, then Open, then Open again. You only do this once.
- Point it at your music
A MinimServer icon appears in the menu bar (top-right). Click it, choose Change folder, and select your music folder (often
/Users/YourName/Music). - Let it scan
Choose Rescan and wait for it to finish indexing.
- Done
Keep the Mac awake while listening (System Settings, then Lock Screen / Battery, prevent sleeping). Then add the recommended configuration below.
↓ MinimServer 2 for Linuxminimserver.com
Pick x64 for a normal PC, or ARM (aarch64 / armhf) for a Raspberry Pi or similar single-board computer. A Pi makes a great always-on, silent music server.
- Install Oracle Java 26+
Install a current Oracle JDK (26 or newer) from Step 0. Confirm with
java -version(it should say 26 or higher, not 1.8). - Download & extract MinimServer
Get the Linux package for your architecture and extract it, for example
tar xzf minimserver-2*.tar.gz. - Run the setup
Run the included setup and console scripts (for example
./minimserver/bin/setupthen./minimserver/bin/startc). A simple text console appears. - Set your music folder
In the console, set the content directory to your music path (for example
/home/you/Musicor a mounted drive), then typerescan. - Run at boot (optional)
Install it as a service so it starts automatically. See the install notes in the package for the systemd unit. Handy for a headless Pi.
- Done
MinimServer is live on your network. Add the recommended configuration below.
↓ MinimServer NAS packages & guidesminimserver.com
A NAS (Synology, QNAP, Asustor, TerraMaster, a Raspberry Pi with drives) is the ideal music server: always on, silent, and it already holds your files. Steps vary by brand, so this is the general path. Your NAS maker's documentation has the exact package.
- Check your NAS app store first
Open your NAS's Package Center (Synology) or App Center (QNAP) and search “MinimServer”. Many NAS have a ready-made package. If yours does, install it and skip to step 4.
- Install Java 26+ on the NAS
If there's no one-click package, first install a current Java (26 or newer, never Java 8) on the NAS.
- Install the MinimServer Linux package
Follow MinimServer's NAS guide (link above) for your model. It walks through copying the Linux package onto the NAS and starting it.
- Point it at your music share
Set MinimServer's content folder to your music shared folder (for example
/volume1/musicon Synology), then rescan. - Allow it through the NAS firewall
If your NAS has a firewall enabled, make sure MinimServer and UPnP aren't blocked, so Serento can find it.
- Done, and it stays on
Your library is now served 24/7 with the computer off. Add the recommended configuration below.
Configure MinimServer for Serento
MinimServer plays fine out of the box, but a few tag settings let it surface the richer metadata Serento loves: composers, conductors, labels, recording info, movements and more. Open MinimServer's Properties tab and add the entries below. You can select each value and copy it straight in.
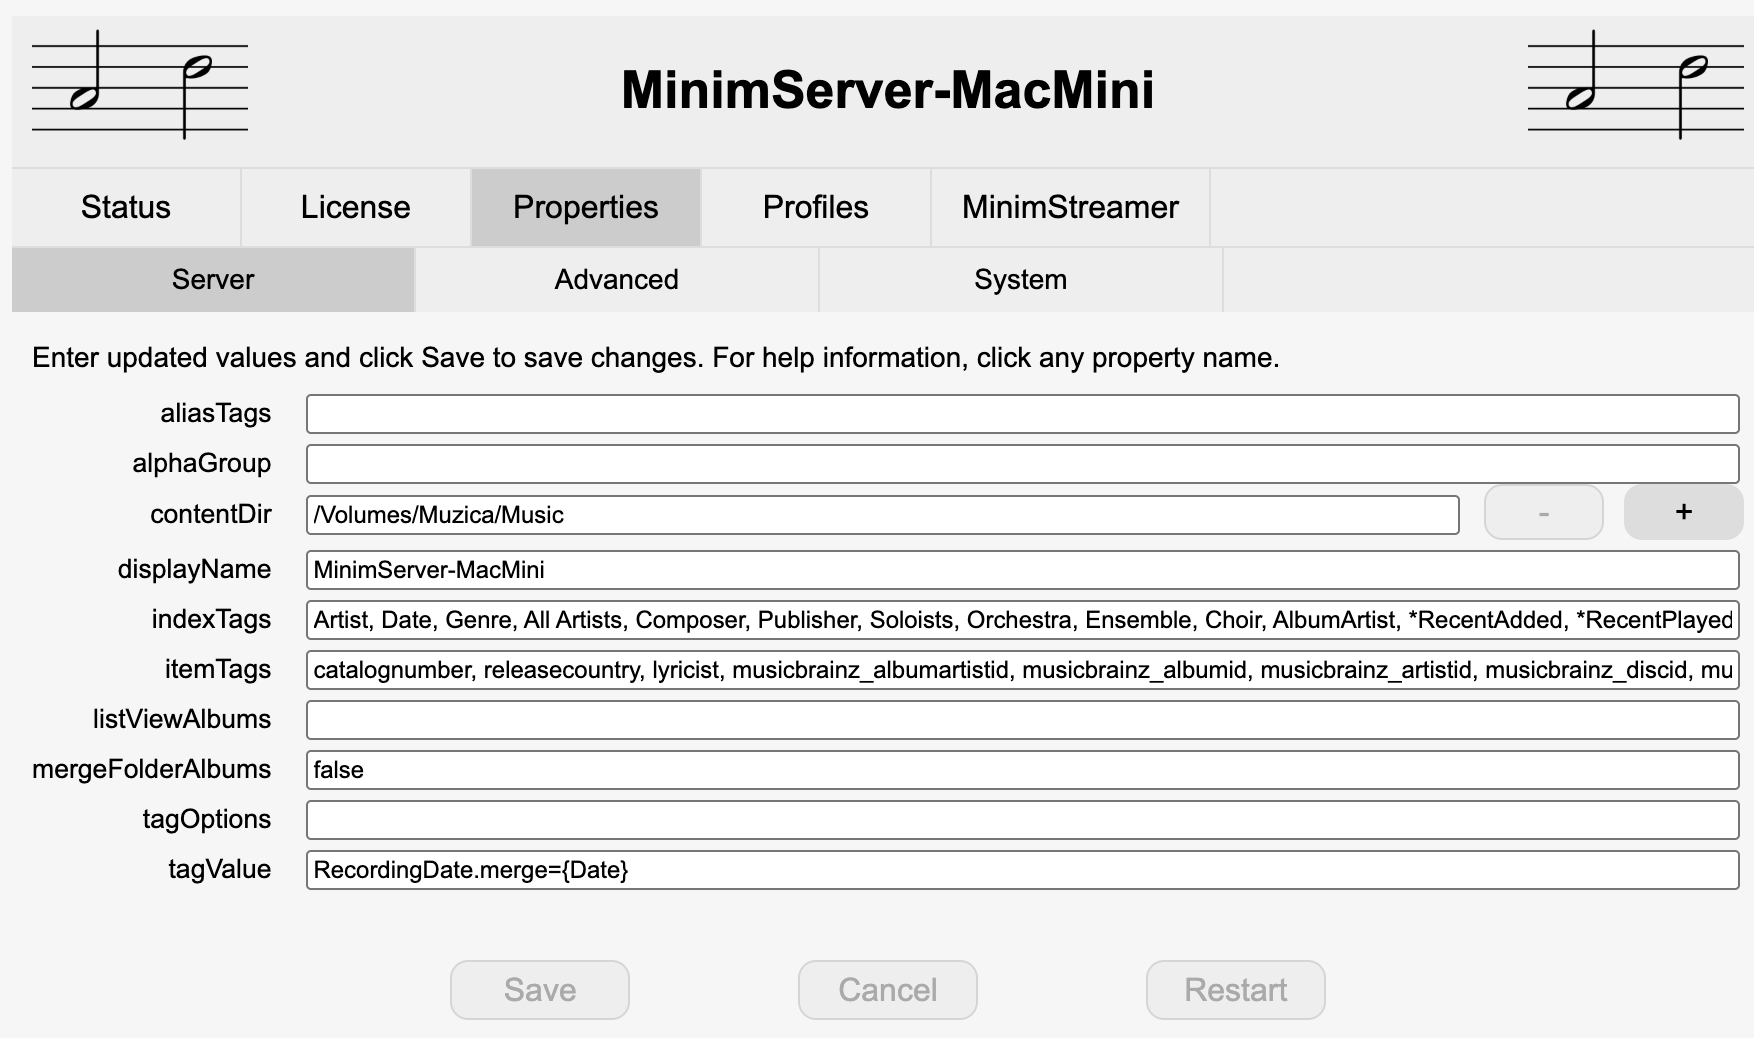
Properties · Server
Properties · Advanced
Two decisions on that line. indexArtwork=folder makes MinimServer take artist, composer and genre pictures from your own folders, so the images you keep beside your music are the ones Serento shows. By default it looks for them in an indexArtwork folder, under Artist, Composer and Genre. Write indexArtwork=auto instead if you would rather MinimServer find them for you. recentAdded sets how long the Recently Added list is, counted in tracks · 1000 gives you the fullest one. Both go on the same serverOptions line, separated by a comma.
- Restart
In the Properties tab, press Restart so the new settings take effect.
- Rescan
In the Status tab, press Rescan. MinimServer re-indexes your library with the new tags.
- Sync in Serento
Serento picks up the new tags on its next Sync Data run. Now jump to Connect in Serento.
A note on cost. MinimServer is free to install and use for browsing and playback. The advanced tag settings below are part of MinimServer's full feature set, which needs a licence: a one-time €32 (or $38 US). Everything else in this guide works on the free version.
Serento settings for MinimServer
Once MinimServer is configured, a few options inside Serento are tailored specifically to it. You'll find them in Settings → Libraries, on your MinimServer entry.
Cover art tip. Keep a high-resolution image (folder.jpg, cover.jpg or similar) in each album folder. Serento prefers the folder image over the artwork embedded in your files · embedded art is often a small 500×500 thumbnail, while the folder image is usually the full-quality cover, and it's what Serento shows on the big Now Playing and album screens.
Set up Plex
Plex installs in one go (no separate Java needed) and you set it up in your web browser. The one thing people forget: you must turn on DLNA. That's the switch that lets Serento see Plex over UPnP. We'll do it at the end.
↓ Plex Media Server, Windowsplex.tv/media-server-downloads
- Download & install
From the link, pick Plex Media Server for Windows, run the installer, click through it.
- It opens in your browser
Plex opens a setup page in your web browser. Create a free account or sign in.
- Add your music library
Click Add Library, then Music, then Browse for Media Folder and choose your music folder. Finish, and Plex scans it.
- Turn on DLNA. This is the important one.
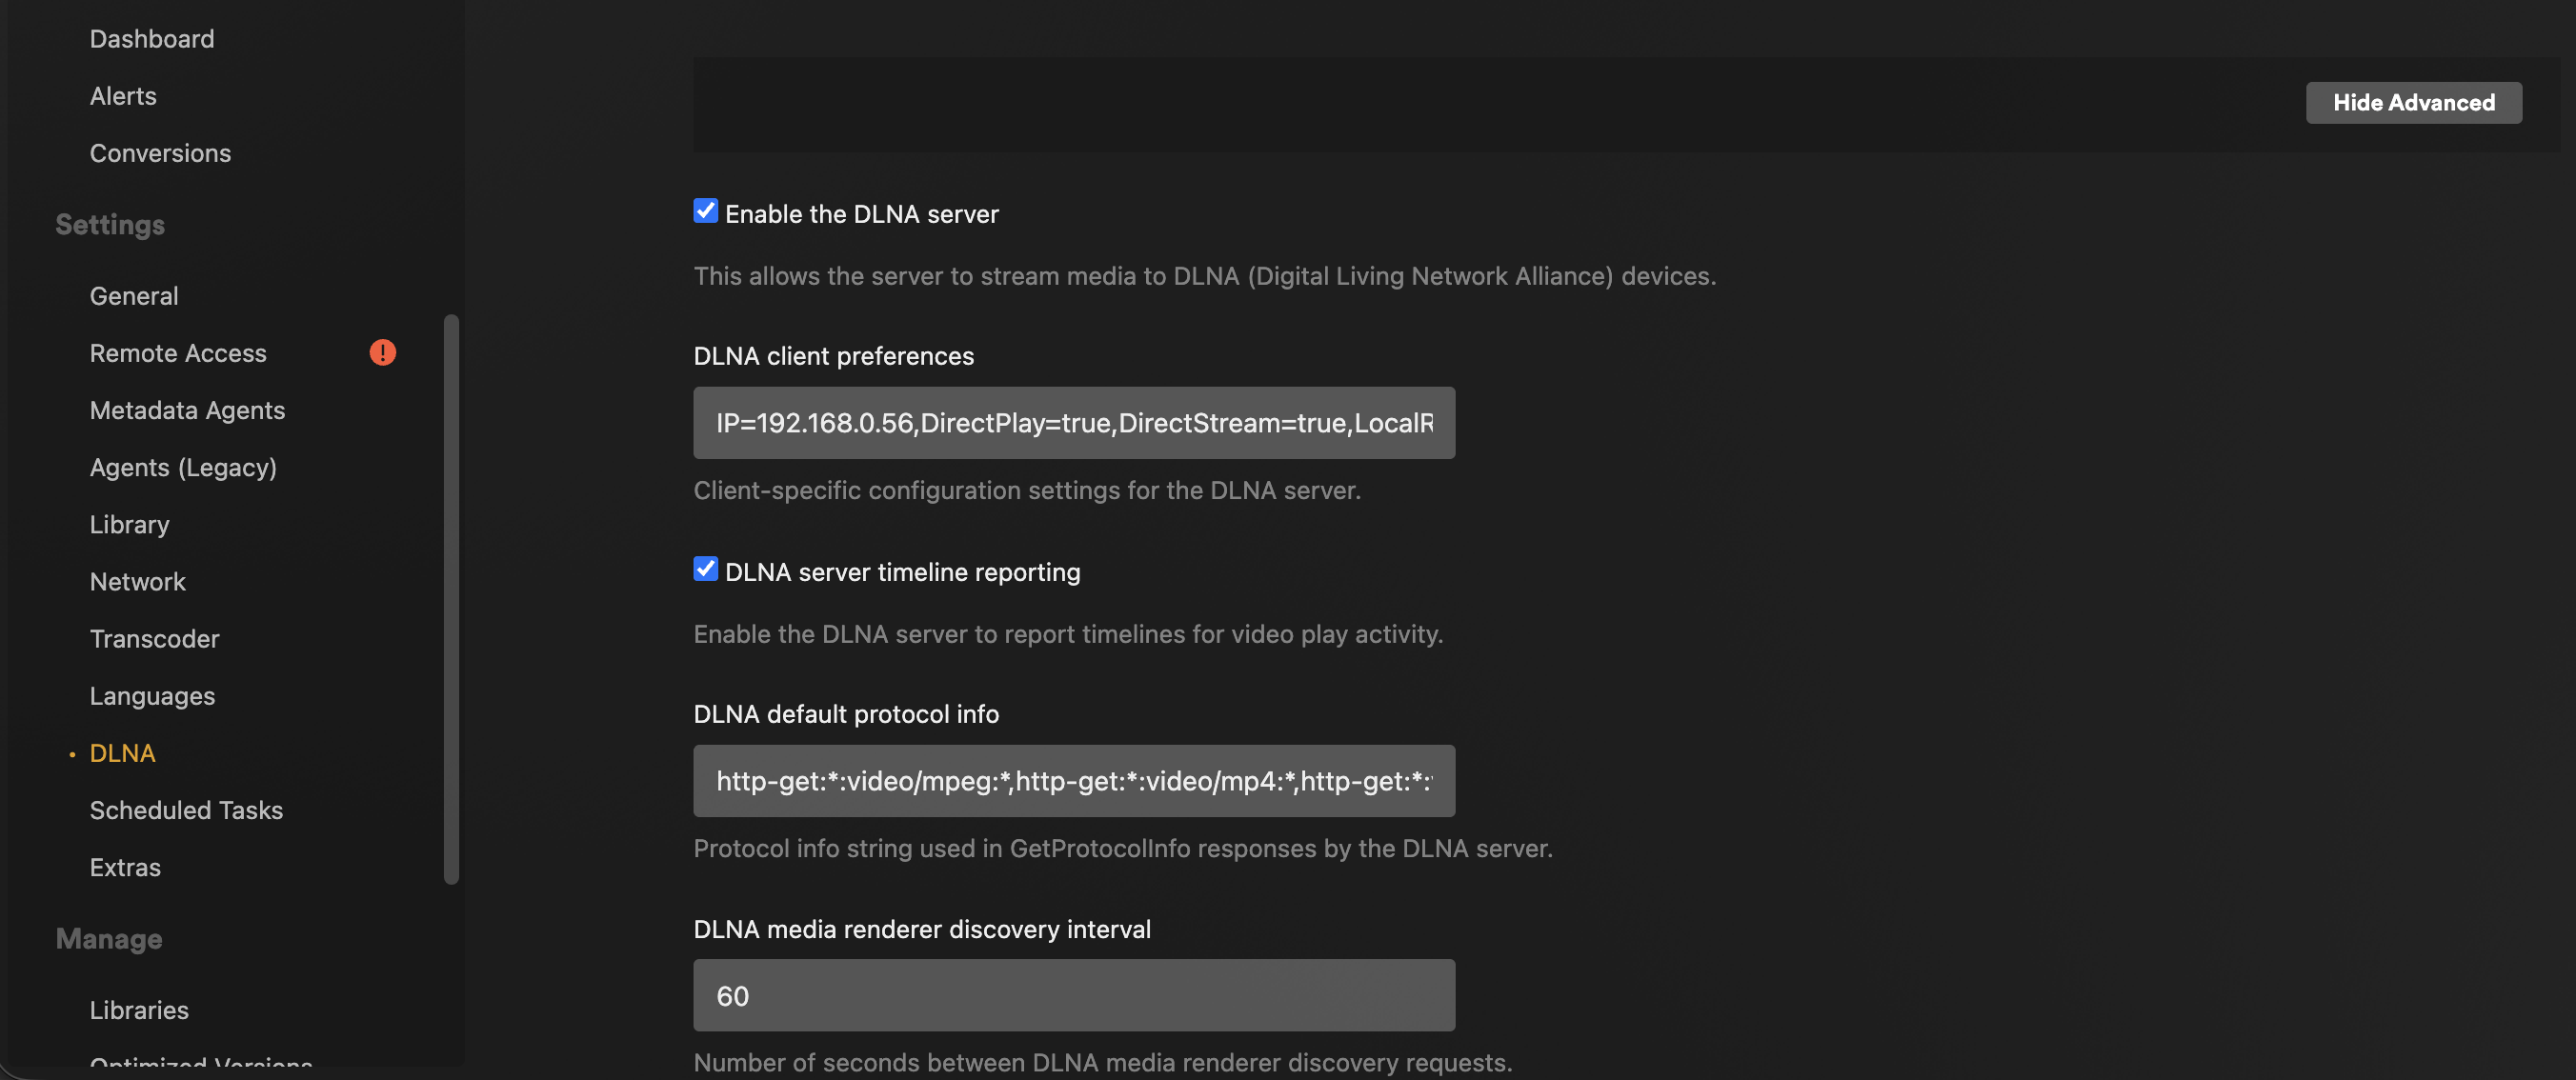
Click the wrench / settings icon (top-right), then Settings, then find DLNA in the left list, tick Enable the DLNA server, and Save Changes. Without this, Serento can't see Plex.
- Done
Leave the PC on while listening. Skip to Connect in Serento.
↓ Plex Media Server, macOSplex.tv/media-server-downloads
- Download & install
Get the macOS version, open the disk image, drag Plex Media Server to Applications, then open it.
- Sign in
Plex opens in your browser. Create a free account or sign in. A Plex icon also sits in the menu bar (top-right).
- Add your music library
Add Library, then Music, then browse to your music folder (for example
/Users/YourName/Music), and finish. - Turn on DLNA
Settings (wrench, top-right), then DLNA, tick Enable the DLNA server, and Save Changes. Required for Serento to find Plex.
- Done
Stop the Mac from sleeping while you listen. Skip to Connect in Serento.
↓ Plex Media Server, Linuxplex.tv/media-server-downloads
- Install the package
Download the right package for your distro (
.debfor Debian/Ubuntu,.rpmfor Fedora/CentOS) and install it, then enable the service so it starts at boot. - Open the web app
In a browser on the same machine go to
http://localhost:32400/weband sign in (free account). - Add your music library
Add Library, then Music, point it at your music folder or mounted drive, and finish.
- Turn on DLNA
Settings, then DLNA, tick Enable the DLNA server, and Save. This is what lets Serento discover Plex.
- Done
Skip to Connect in Serento.
↓ Plex Media Server, NASplex.tv/media-server-downloads
Plex has official packages for Synology, QNAP, Asustor, Netgear, TerraMaster, Western Digital, Seagate and more, plus Docker and Unraid. Pick your brand on the download page.
- Install Plex on the NAS
Either from your NAS's app store (search “Plex Media Server”) or by downloading the package for your exact model from the link and installing it via the NAS web interface.
- Open Plex & sign in
Launch Plex from the NAS. It opens the Plex web app. Create a free account or sign in.
- Add your music library
Add Library, then Music, choose your NAS music shared folder (for example
/volume1/music), and finish. - Turn on DLNA
Settings, then DLNA, tick Enable the DLNA server, and Save. Don't skip this. It's the UPnP switch.
- Done, always on
Your music is served around the clock. Skip to Connect in Serento.
Connect & sync in Serento
Server running? Now Serento finds it automatically, as long as your iPhone, iPad or Mac is on the same Wi-Fi.
- Same network
Check that your device is on the same Wi-Fi as the server, not a separate “Guest” network. This is the number-one thing people miss.
- Open Serento
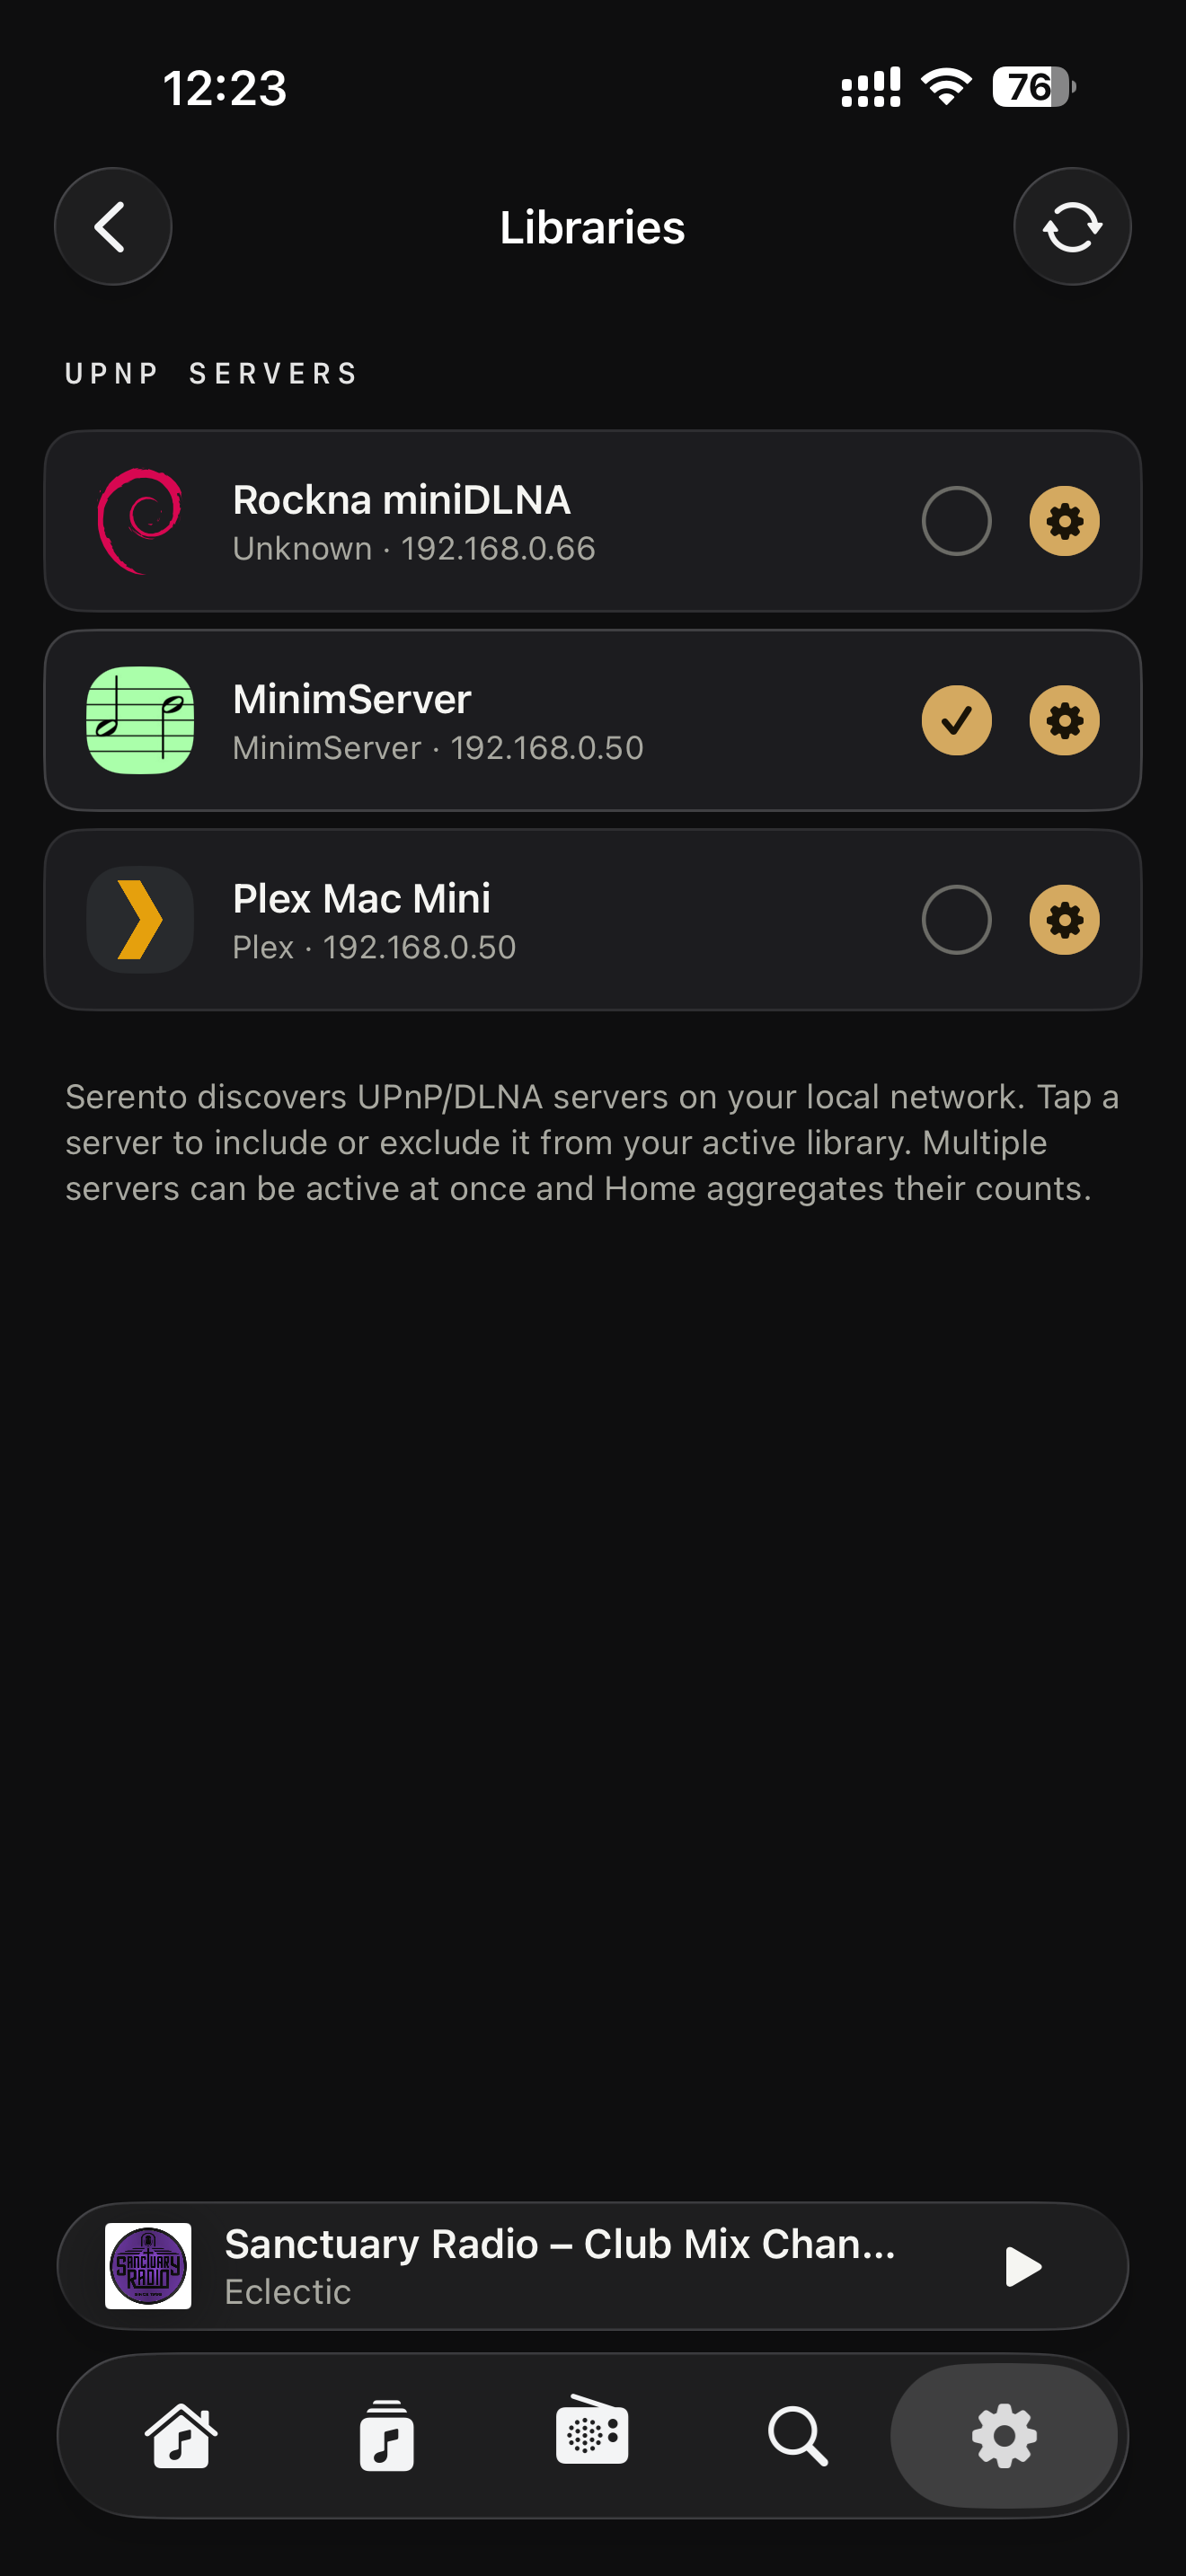
Launch the app. On first run, or any time from Settings, then Servers, Serento scans your network for music servers.
- Pick your server
Your MinimServer or Plex appears in the list. Tap it to select it as your library source.
- Let it sync
Serento pulls in your albums, artists and tracks. A large library takes a moment the first time, then it's cached for instant browsing.
- Choose where it plays
Tap the output picker and pick your network streamer (the renderer), or pick This device to play through the phone, iPad or Mac itself.
- Press play
That's the whole thing. Bit-perfect and local. Enjoy.
Troubleshooting
Nine times out of ten it's one of these. Work down the list.
Check, in order: (1) the device and the server are on the same Wi-Fi, not a guest network or an isolated band; (2) the server is actually running and finished its first scan; (3) on Plex, you enabled DLNA; (4) a firewall (Windows Defender, your NAS firewall, or your router's “client isolation / AP isolation” setting) isn't blocking it. Restarting the server and the app clears most cases.
You almost certainly haven't turned on DLNA. In Plex go to Settings, then DLNA, tick Enable the DLNA server, and Save Changes, then reopen Serento. That switch is what publishes Plex over UPnP.
It's nearly always Java. Make sure you have Oracle Java 26 or newer installed, not Java 8. On Windows and Mac re-run the Oracle installer; on Linux and NAS check java -version. After installing the right Java, start MinimServer again.
The server's library folder is wrong or hasn't been scanned. Re-open the server, confirm the music folder points at your actual files, and run Rescan. Give a large collection time to finish before expecting it in Serento.
The same network rules apply to the streamer: it must be on the same Wi-Fi or LAN and powered on. You don't need a streamer at all to start. Choose This iPhone / iPad / Mac as the output and play through the device directly.
UPnP discovery (it uses multicast) can be blocked when devices sit on different subnets. That's common with a separate guest network, some mesh setups, or business-style VLANs. Put the server, the streamer and your phone on the same network or SSID. If your router has “AP isolation”, “client isolation” or “IGMP snooping” causing trouble, that's the culprit.
Tell us your setup and a person replies.
Tell us your setup (server, operating system, and what you see) and we'll walk you through it personally.
Updated June 2026 · MinimServer & Plex · Oracle Java 26+ · Questions: contact@serento.app